How to Wire a 7 Way Trailer Plug & Trailer 1
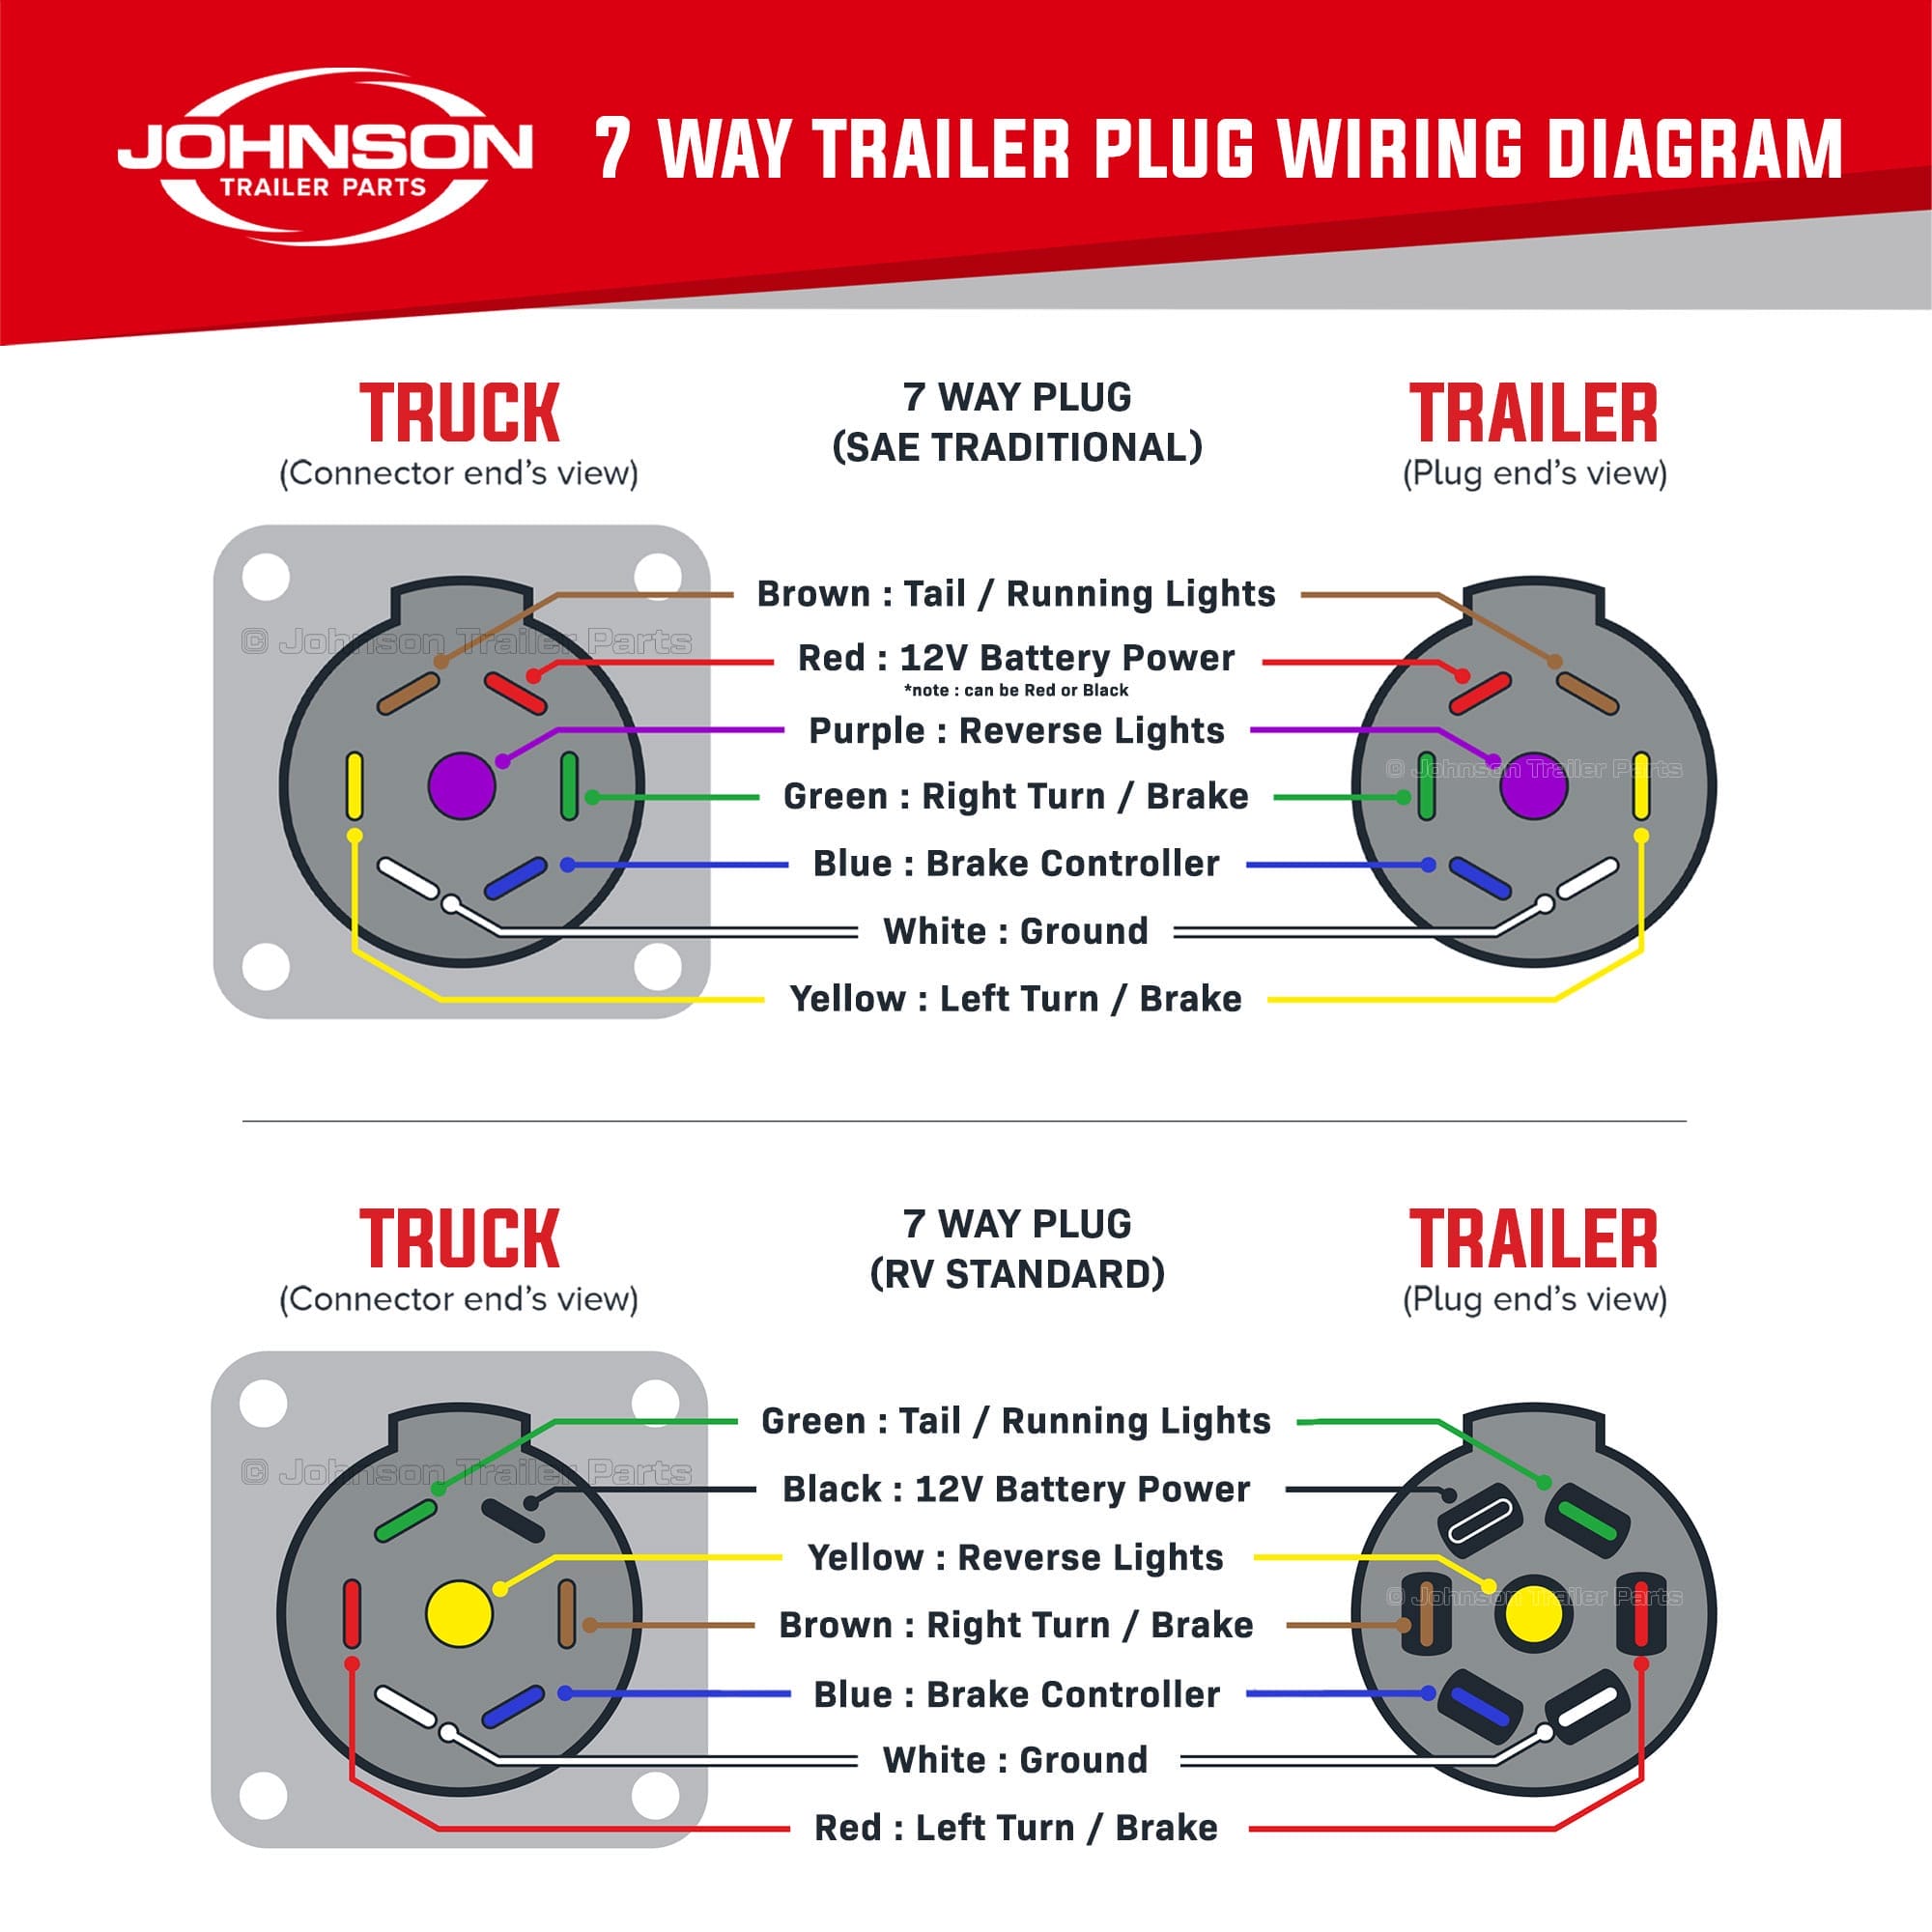
Step 1: Wiring Your 7 way Trailer Plug and Socket
A 7-way trailer plug is one of the most common plugs for connecting your trailer to your vehicle, providing the electrical supply necessary for lights and additional trailer functions. This connection system is crucial for maintaining safety and legality on the road. It not only supports basic lighting functions—such as tail lights, turn signals, and brake lights—but also includes pins for electric trailer brakes, reverse lights, and a 12V power supply. This is important in recreational vehicles (RVs) and other larger trailers equipped with brake axles.
While the 7-way RV plug is the standard, an SAE plug option is also available. Knowing the differences between these two can help you identify which one you have (or need) and understand the correct wiring requirements.
Note: As shown in the diagram below, the functions of each pin are identical between the RV Standard and SAE Tradition; the distinction is in the color scheme.
Step 2: Wiring your RV Junction Box
An RV Junction Box is a great solution for securing and organizing your trailer’s wiring. Many RV junction boxes come with a pre-connected 7-way plug and cord, which streamlines the installation process. To connect your wiring, simply align it with the corresponding post as shown in the provided diagram below. It’s important to note that the RV Junction Box is typically configured for the RV Standard wiring scheme. If your trailer is equipped with SAE Traditional wiring, refer to the following wiring information for guidance on connecting your wires to the junction box.
For connecting SAE traditional wiring to an RV junction box, focus on matching the wire functions rather than their colors, due to potential variations between SAE wiring and RV systems.
SAE Traditional Wiring to RV Junction Box
- White Wire connects to White Post (Ground)
- Brown Wire connects to Green Post (Tail / Running Lights)
- Yellow Wire connects to Red Post ( Left Turn)
- Green Wire connects to Brown Post (Right Turn)
- Blue Wire connects to Blue Post ( Brake Controller)
- Red / Black Wire connects to Black Post (12V Hot)
- Purple Wire connects to Yellow Post (Reverse Lights)
Connecting 7-way RV wires to the RV junction box is usually straightforward as the wire colors and functions are designed to match, simplifying the setup.
Most RV junction boxes use #10 ring terminals along with M5-0.80 or #10-32 nuts.

Step 3: Wiring Your Trailer
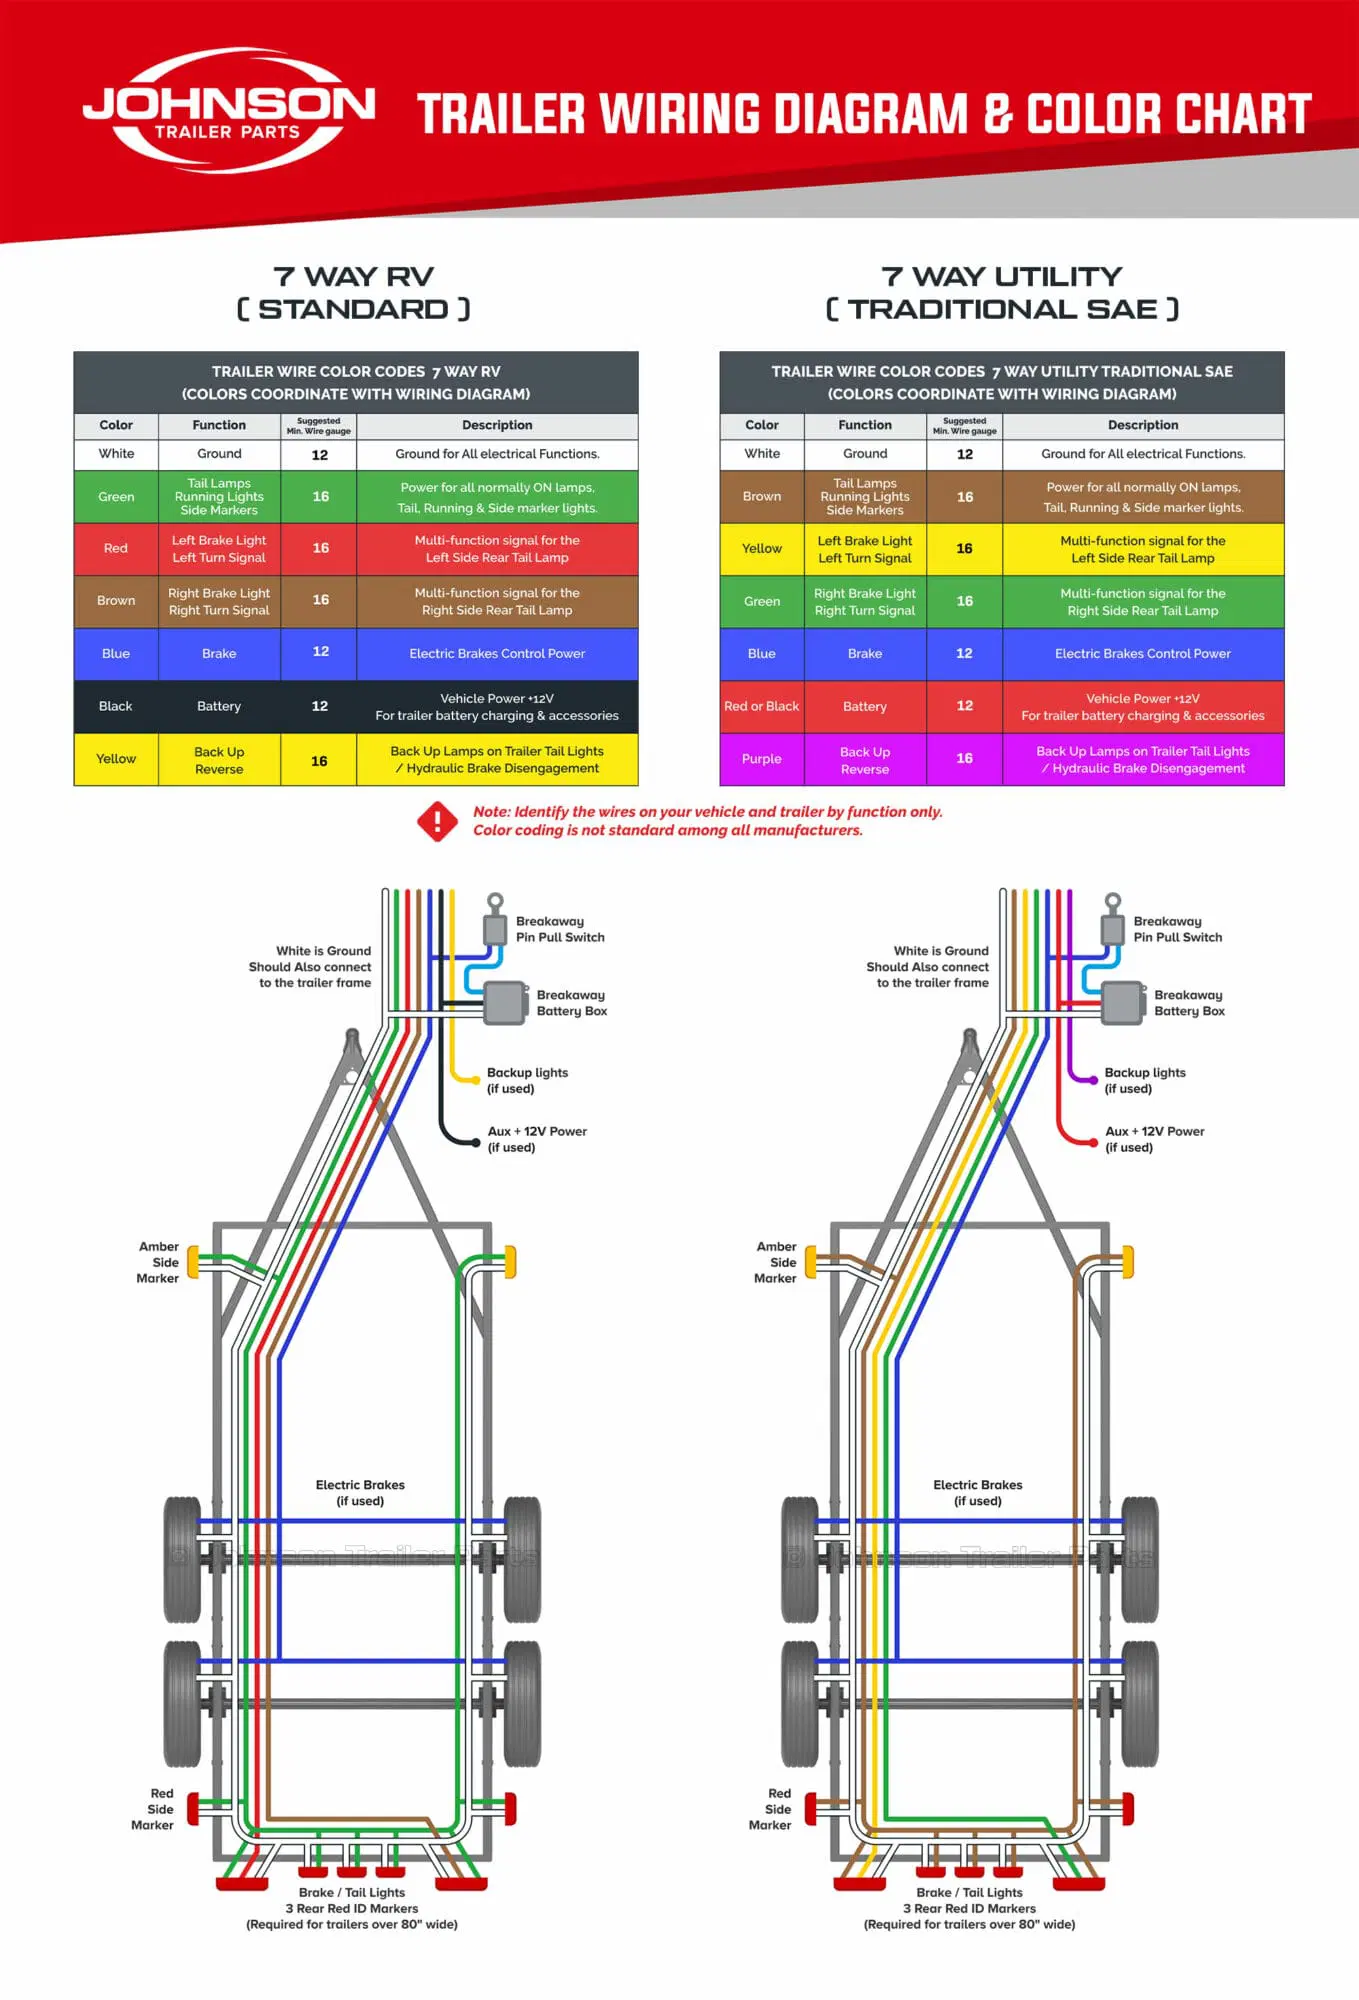
Maintaining operational trailer lights and wiring is essential for safety. Wiring your trailer typically aligns with two main standards: RV Standard and SAE Traditional. Cargo, equipment, and utility trailers commonly adhere to the SAE Traditional wiring scheme. Below are diagrams showing the layout for each standard.
Wire size
There are various wire sizes to choose from, typically categorized by “Gauge.” A lower gauge number indicates a thicker wire. For lighting applications, we recommend using wires that are 16 gauge or thicker. For components that require more power, such as brakes or auxiliary power systems, we recommend thicker wires, such as 14 gauge or 12 gauge.
Ground Wire
The trailer wiring diagram below shows that the ground wire extends to all lights and brakes and should also connect to components using the 12V Power and Reverse lights, if applicable.
For smaller trailers using a 4-way flat connector and without brakes, it is typical to attach the ground wire to the trailer tongue and connect the ground leads from all lights to the frame as well. While widely used, this method can cause grounding issues, especially in systems with 7-way wiring. To prevent these problems, we recommend installing a dedicated ground wire that runs alongside other wires, with each light’s ground directly connected to this dedicated wire.
Additionally, we recommend connecting the ground wire to the trailer frame.
The size of the ground wire should at least match the largest wire in your harness. For circuits with only LED lights, a smaller ground wire may be sufficient. However, for circuits that include electric brakes or auxiliary power, a thicker ground wire is necessary to handle the increased power requirements safely.
Wire Connectors
We recommend using heat shrink solder butt connectors and heat shrink solder ring terminals (Crimp shrink connectors work great as well and may be a bit cheaper). Simply use a heat gun to melt the solder and shrink the tubing, creating a durable and watertight seal.
Trailer Breakaway Kit
The safety of your towing setup is important, and a key safety component is the breakaway kit. This kit is designed to activate the trailer brakes automatically if the trailer disconnects from the tow vehicle, a crucial feature and often a legal requirement for trailers above certain weight thresholds. Want to know more about breakaway kits? Check out this Great Article.
Step 4: Wiring Your Trailer Lights
With a wide variety of trailer lights readily available, we suggest opting for LED lights. LED lights not only consume less power but also provide brighter illumination compared to traditional bulbs, and they generally have a longer lifespan.
Looking for information on trailer lighting requirements? See this document for DOT Requirements provided by TecNiq Inc. Also, explore this great article on Trailer Lights and Wires for more insights.
Refer to the diagram below for the standard wire colors and their functions, commonly used in most trailer lights.

Step 5: Completion
Wiring a trailer may initially seem complicated, but with the right diagrams and guidance, it becomes much simpler. Ensure that all connections are properly secured to maintain functionality and safety during your travels.
Once you’re finished, connect your trailer to your vehicle and make sure to double-check that all functions are working correctly.
If you need further assistance or have specific questions about trailer wiring, feel free to reach out to us at Johnson Trailer Parts. Our team is here to help you ensure that your trailer is road-ready and safe. Contact us at sales@johnsontrailerparts.com or call us at (602) 292-9690. We’re here to assist you with all your trailer needs!
Be sure to check out our video below showing you how to wire a new 7 way plug and RV Junction Box.
Can I ask why you show the “Break away battery box” as a nebulous box with three wires going in to it, when you show so much of the other detail on everything else? why not simply show the 12v acc going to the blue by connecting to the “Breakaway pin pull switch” its a very odd detail to omit, but for people who are struggling to grasp this information, it would be helpful. Or maybe add another photo with an image of the internal battery that people install for interior lighting? your page doesn’t let you include an image, so I here is a link to what I mean: https://files.kamit.ca/7_Way_-_with_detail.png I just feel this detail would help a lot of people.